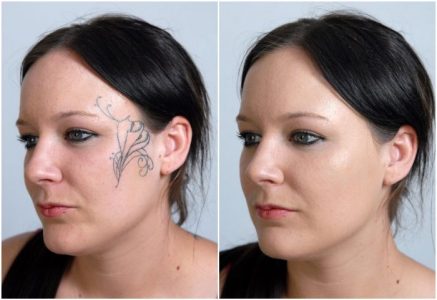
Easy Guide to Tattoo Cover-Up
Do you have tattoos that you’d rather have covered? Veil Cover Cream provides effective, natural-looking tattoo cover. Find out more.
Covering a tattoo can be due to many reasons. Perhaps you have a special occasion or a job interview. Maybe you regret getting your ex’s name or you no longer like it. Whatever the reason, our Tattoo Camouflage Kit is the perfect solution for temporary tattoo cover.
Here’s our quick easy guide to covering tattoos.
First things first – select your shade & prepare the area needing coverage.
- Mix shades to find your perfect colour match
All the shades in our Tattoo Camouflage Kit can be mixed to create new colours for a perfect colour match to your skin tone. For example the concealer colour is too dark, add some white tint to create your desired shade.
- Choose your shade in natural light, not artificial light
When selecting the shade for tattoo coverage make sure you are in natural light. Artificial light can change the appearance of the concealers shade. You might get a false colour match when in a bathroom or well lit room so always move to a natural light when choosing the perfect shade.
- Consider shaving the area before applying your Cover Cream
Tattoo coverage can be anywhere on the body so if the area of the tattoo is particularly hairy, consider shaving the area before applying the Tattoo Camouflage product. This allows for an even coverage and stops the area becoming cakey or heavy.

Application
STEP 1 – PREPARATION
- Apply the Cleansing Cream to ensure the area is clean and dry before wiping off with a tissue. Then apply the Toning Lotion which removes any remaining oiliness.
- Choose the perfect shade of Veil Cover Cream to match the natural skin tone of the tattooed area. Shades can be mixed together easily to create the perfect shade.
STEP 2 – STARTING THE APPLICATION
- Take a small amount of the Veil Cover Cream using a small spatula.
- Dab on very small amounts of Veil Cover Cream with your finger or a sponge using a patting motion. Do not rub.
STEP 3 – FINISHING THE APPLICATION
- Continue dabbing the Veil Cover Cream over the whole tattoo area.
- If the tattoo is still visible, apply another thin layer. Applying thin layers prevents the product from becoming heavy or uneven.
- Gently blend the edges into the skin surrounding the tattoo.
STEP 4 – THE FINAL STEP
- The final step in this process is to set the Veil Cover Cream with Finishing Powder. Press on plenty of Finishing powder using the cotton pador a cotton ball. Use a rocking and pressing motion. Do not rub.
- Gently brush off excess powder with the brush provided.
- The Cover Cream is now set. Your tattoo will not run off and if an area of the tattoo does become exposed, it can be spot touched up with Veil Cover Cream. But make sure to pat the area when drying rather than rubbing.


